AVSUtils/src/Logger/ThreadIdAsString.cpp, has a static thread_local variable and includes <thread>, and since this file is used indirectly from the ExampleLogger, this issue is showing up as an issue in ExampleLogger. Currently, ACL and AuthDelegate both find the Threads package and link against in their src/CMakeLists.txt file, so we don't see such issues when creating those libraries. However, AVSUtils does not do this. The fix for this particular issue (https://github.com/alexa/alexa-client-sdk/issues/3) is to find the Threads package and link against it in the AVSUtils library as well, which this commit does. This commit also pulls in the Threads package and links against it in other areas that include <thread> so that we don’t run into this issue down the road by mistake. |
||
|---|---|---|
| ACL | ||
| ADSL | ||
| AFML | ||
| AVSCommon | ||
| AVSUtils | ||
| AuthDelegate | ||
| Integration | ||
| ThirdParty | ||
| build | ||
| doc | ||
| tools | ||
| CMakeLists.txt | ||
| LICENSE.txt | ||
| NOTICE.txt | ||
| README.md | ||
README.md
Alexa Client SDK v0.2
This release of the Alexa Client SDK for C++ provides components for authentication and communications with the Alexa Voice Service (AVS), specifically AuthDelegate, Alexa Communications Library (ACL), Alexa Directive Sequencer Library (ADSL), Activity Focus Manager Library (AFML), and associated APIs.
Overview
The Alexa Client SDK provides a modern C++ (11 or later) interface for AVS that allows developers to add intelligent voice control to connected products. It is modular and abstracted, providing components to handle discrete functionality such as speech capture, audio processing, and communications, with each component exposing APIs that you can use and customize for your integration.
Common Terms
- Interface - A collection of logically grouped messages called directives and events, which correspond to client functionality, such speech recognition, audio playback, and volume control.
- Directives - Messages sent from AVS that instruct your product to take action.
- Events - Messages sent from your product to AVS notifying AVS something has occurred.
- Downchannel - A stream you create in your HTTP/2 connection, which is used to deliver directives from AVS to your product. The downchannel remains open in a half-closed state from the device and open from AVS for the life of the connection. The downchannel is primarily used to send cloud-initiated directives and audio attachments to your product.
- Cloud-initiated Directives - Directives sent from AVS to your product. For example, when a user adjusts device volume from the Amazon Alexa App, a directive is sent to your product without a corresponding voice request.
SDK Architecture
This architecture diagram illustrates the data flows between components that comprise the Alexa Client SDK.
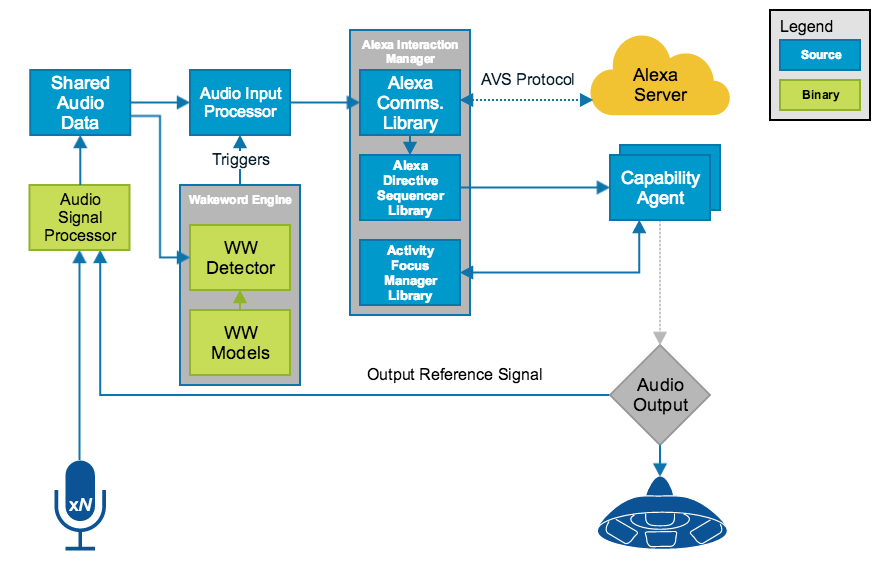
Audio Signal Processor (ASP) - Applies signal processing algorithms to both input and output audio channels. The applied algorithms are designed to produce clean audio data and include, but are not limited to: acoustic echo cancellation (AEC), beam forming (fixed or adaptive), voice activity detection (VAD), dynamic range compression (DRC), and noise reduction (NR). If a multi-microphone array is present, the ASP constructs and outputs a single data stream for the array.
Wake Word Engine (WWE) - Spots wake words in an input stream. It is comprised of two binary interfaces. The first handles wake word spotting (or detection), and the second handles specific wake word models (in this case "Alexa"). Depending on your implementation, the WWE may run on the system on a chip (SOC) or dedicated chip, like a digital signal processor (DSP).
Shared Audio Data - Allows audio to be shared and proxied between the WWE and the AIP. It is a single writer, multiple reader interface, where each reader may be at different locations behind the writer.
Audio Input Processor (AIP) - Manages the captured audio streamed to AVS. Input sources may include: on-product microphones, remote microphones, etc. The Alexa Client SDK expects a single audio input from the AIP.
Alexa Interaction Manager (AIM) - Comprised of three components, the Alexa Communications Library (ACL), the Alexa Directive Sequencer Library (ADSL), and Activity Focus Manager Library (AFML), it handles communications with AVS and message routing to capability agents.
Alexa Communications Library (ACL) - Serves as the main communications channel between a client and AVS. The Performs two key functions:
- Establishes and maintains long-lived persistent connections with AVS. ACL adheres to the messaging specification detailed in Managing an HTTP/2 Conncetion with AVS.
- Provides message sending and receiving capabilities, which includes support JSON-formatted text, and binary audio content. For additional information, see Structuring an HTTP/2 Request to AVS.
Alexa Directive Sequencer Library (ADSL): Manages the order and sequence of directives from AVS, as detailed in the AVS Interaction Model. This component manages the lifecycle of each directive, and informs the Directive Handler (which may or may not be a Capability Agent) to handle the message.
See Appendix C for a diagram of the directive lifecycle.
Activity Focus Manager Library (AFML): Provides centralized management of audiovisual focus for the device. Focus is based on channels, as detailed in the AVS Interaction Model, which are used to govern the prioritization of audiovisual inputs and outputs.
Channels can either be in the foreground or background. At any given time, only one channel can be in the foreground and have focus. If multiple channels are active, you need to respect the following priority order: Dialog > Alerts > Content. When a channel that is in the foreground becomes inactive, the next active channel in the priority order moves into the foreground.
Focus management is not specific to Capability Agents or Directive Handlers, and can be used by non-Alexa related agents as well. This allows all agents using the AFML to have a consistent focus across a device.
Capability Agents: Handle Alexa-driven interactions; specifically directives and events. Each capability agent corresponds to a specific interface exposed by the AVS API. These interfaces include:
- SpeechRecognizer - The interface for speech capture.
- SpeechSynthesizer - The interface for Alexa speech output.
- Alerts - The interface for setting, stopping, and deleting timers and alarms.
- AudioPlayer - The interface for managing and controlling audio playback.
- PlaybackController - The interface for navigating a playback queue via GUI or buttons.
- Speaker - The interface for volume control, including mute and unmute.
- System - The interface for communicating product status/state to AVS.
Minimum Requirements and Dependencies
- C++ 11 or later
- GNU Compiler Collection (GCC) 4.8x or later OR Clang 3.3 or later
- CMake 3.0 or later
- libcurl 7.50.2 or later
- nghttp2 1.0 or later
- OpenSSL 1.0.2 or later OR LibreSSL 2.5.0 or later
Obtain LWA Credentials
To access AVS, your product needs to obtain Login with Amazon (LWA) credentials to establish a connection and make requests on behald of the user. Instructions are available for Remote Authorization and Local Authorization.
Remote Authorization
Local Authorization
Test Credentials
For initial testing, instructions are available to quickly obtain a clientId, clientSecret, and refreshToken. This method should not be used as a replacement for Remote Authorization or Local Authorization. For additional information, see Appendix A.
Setup Your AuthDelegate
The role of AuthDelegate is to exchange LWA credentials for an access token, and pass the access token to the ACL when getToken() is called.
After you've obtained LWA credentials, you need to edit your AuthDelegate configuration (/AuthDelegate/src/Config.cpp). Replace all values prefixed with INSERT_YOUR:
static const std::string DEFAULT_CLIENT_ID = "INSERT_YOUR_CLIENT_ID";
static const std::string DEFAULT_REFRESH_TOKEN = "INSERT_YOUR_REFRESH_TOKEN";
static const std::string DEFAULT_CLIENT_SECRET = "INSERT_YOUR_CLIENT_SECRET";
After adjusting the configuration, follow the instructions for your OS to create an out-of-source build.
Create an Out-of-Source Build
The following instructions assume that all requirements and dependencies are met and that you have cloned the repository (or saved the tarball locally).
CMake Build Types and Options
The following build types are supported:
DEBUG- Shows debug logs with-gcompiler flag.RELEASE- Adds-O2flag and removes-gflag.MINSIZEREL- Compiles withRELEASEflags and optimizations (-Os) for a smaller build size.
To specify a build type, use this command in place of step 4 below (see Build for Generic Linux or Build for macOS):
cmake <path-to-source> -DCMAKE_BUILD_TYPE=<build-type>
Note: To list all available CMake options, use the following command: -LH.
Build for Generic Linux
To create an out-of-source build for Linux:
- Clone the repository (or download and extract the tarball).
- Create a build directory out-of-source. Important: The directory cannot be a subdirectory of the source folder.
cdinto your build directory.- From your build directory, run
cmakeon the source directory to generate make files for the SDK:cmake <path-to-source-code>. - From the build directory, run
maketo build the SDK.
Build for macOS
Building for macOS requires some additional setup. Specifically, you need to ensure that you are running the latest version of cURL and that cURL is linked to nghttp2 (the default installation does not).
To recompile cURL, follow these instructions:
- Install Homebrew, if you haven't done so already.
- Install cURL with HTTP2 support:
brew install curl --with-nghttp2 - Force cURL to explicitly link to the updated binary:
brew link curl --force - Close and reopen terminal.
- Confirm version and source with this command:
brew info curl
To create an out-of-source build for macOS:
- Clone the repository (or download and extract the tarball).
- Create a build directory out-of-source. Important: The directory cannot be a subdirectory of the source folder.
cdinto your build directory.- From your build directory, run
cmakeon the source directory to generate make files for the SDK:cmake <path-to-source-code>. - From the build directory, run
maketo build the SDK.
Run Unit Tests
Unit tests for the Alexa Client SDK use the Google Test framework. Ensure that the Google Test is installed, then run the following command:
make all test
Ensure that all tests are passed before you begin integration testing.
Run Integration Tests
Integration tests ensure that your build can make a request and receive a response from AVS. All requests to AVS require auth credentials.
Important: Integration tests for v0.2 do not use AuthDelegate. Instead, the tests reference an AuthDelegate.config file, which you must create.
Create the AuthDelegate.config file
To create AuthDelegate.config:
- Navigate to the
Integrationfolder. - Create a file named
AuthDelegate.config. - Populate the file with the following key/value pairs.
clientId=YOUR_CLIENT_ID_HERE
refreshToken=YOUR_REFRESH_TOKEN_HERE
clientSecret=YOUR_CLIENT_SECRET_HERE
After you've entered your credentials, save the file and run this command:
make all integration
Alexa Client SDK API Documentation
To build the Alexa Client SDK API documentation, run this command from your build directory: make doc.
Resources and Guides
- Step-by-step instructions to optimize libcurl for size in
*nixsystems. - Step-by-step instructions to build libcurl with mbed TLS and nghttp2 for
*nixsystems.
Appendix A: Obtain Test Credentials
The output of these steps are a Client ID, Client Secret, and Refresh Token, which are required to use the AuthDelegate.
Step 1: Register a Product
These instructions walk through registering a product. If you've already registerd a product, you can skip ahead to Step 2.
- Login to the Amazon Developer Portal. If you don't have an account, create one now.
- Navigate to the Alexa Dashboard. Select Get Started under Alexa Voice Service. Then click Register a Product Type and select Device.
- Follow the instructions provided by the registration wizard.
Make note of the following values. You'll need these later:
- Device Type ID (also called
ProductID) - Client ID, and
- Client Secret
- Allowed Return URL
Important: Make sure your Allowed Origins and Allowed Return URLs are set under Security Profile > Web Settings. For example:
- Allowed Origins: https://localhost:3000
- Allowed Return URLs: https://localhost:3000/authresponse
Step 2: Make an Authorization Code Grant Request
In this step, we'll build a URL to exchange your Client ID, Device Type ID and Allowed Return URL for an Authorization Code.
- Use this URL as your template:
https://www.amazon.com/ap/oa?client_id=<<Client_ID>>&scope=alexa%3Aall&scope_data=%7B%22alexa%3Aall%22%3A%7B%22productID%22%3A%22<<Device_Type_ID>>%22,%22productInstanceAttributes%22%3A%7B%22deviceSerialNumber%22%3A%22<<Device_Serial_Number>>%22%7D%7D%7D&response_type=code&redirect_uri=<<Allowed_Return_URL>> - Replace
<<Client_ID>>,<<Device_Type_ID>>, and<<Allowed_Return_URL>>with the values you recorded in Step 1. Note: Some of these values may need to be URL encoded. If you don't have a tool, you can use a tool like http://www.urlencoder.org. - Replace
<<Device_Serial_Number>>with any alphanumeric combination (or an actual product serial number). - Paste the URL you've created into your favorite browser.
- When prompted, login with your Amazon Developer Account. Note: You may be taken to a confirmation page. If you are, click Confirm.
- This will redirect you to your Allowed Return URL with a query parameter specifying a
codevalue. Note: The URL should look like this<<Allowed_Return_URL>>?code=<<code>>&scope=alexa%3Aall>> - Copy the
codevalue. You'll need this to obtain a refresh token.
Step 3: Obtain a Refresh Token
In this step we'll make a POST request to obtain a Refresh Token. Ensure that you have cURL installed (or an alternative, such as wget).
- Use this curl request as your template:
curl -X POST --data "grant_type=authorization_code&code=<<code>>&client_id=<<Client_id>>&client_secret=<<Client_secret>>&redirect_uri=<<Allowed_Return_URL>>" https://api.amazon.com/auth/o2/token - Replace
<<code>>,<<Client_ID>>,<<Client_Secret>>, and<<Allowed_Return_URL>>with the values you recorded earlier. Note: Some of these values may need to be URL encoded. If you don't have a tool, you can use a tool like http://www.urlencoder.org. - If successful, a JSON string will print to your console. Locate
refresh_tokenand record the value.
Step 4: Update AuthDelegate
Now that you've obtained your Client ID, Client Secret, and Refresh Token, you need to edit your AuthDelegate configuration (/AuthDelegate/src/Config.cpp). Replace all values prefixed with INSERT_YOUR:
static const std::string DEFAULT_CLIENT_ID = "INSERT_YOUR_CLIENT_ID";
static const std::string DEFAULT_REFRESH_TOKEN = "INSERT_YOUR_REFRESH_TOKEN";
static const std::string DEFAULT_CLIENT_SECRET = "INSERT_YOUR_CLIENT_SECRET";
Appendix B: Memory Profile
This appendix provides the memory profiles for various modules of the Alexa Client SDK. The numbers were observed running integration tests on a machine running Ubuntu 16.04.2 LTS.
| Module | Source Code Size (Bytes) | Library Size RELEASE Build (libxxx.so) (Bytes) | Library Size MINSIZEREL Build (libxxx.so) (Bytes) |
|---|---|---|---|
| ACL | 300 KB | 245 KB | 227 KB |
| ADSL | 188 KB | 180 KB | 169 KB |
| AFML | 100 KB | 114 KB | 109 KB |
Runtime Memory
Unique size set (USS) and proportional size set (PSS) were measured by SMEM while integration tests were run.
| Runtime Memory | Max USS (Bytes) | Max PSS (Bytes) |
|---|---|---|
| ACL | 22 MB | 23 MB |
| ADSL + ACL | 26 MB | 27 MB |
Definitions
- USS: The amount of memory that is private to the process and not shared with any other processes.
- PSS: The amount of memory shared with other processes; divided by the number of processes sharing each page.
Appendix C: Directive Lifecycle Diagram

Release Notes
v0.2 of the Alexa Client SDK includes components for authentication, communications, message orchestration, and focus management. These include AuthDelegate, ACL, ADSL, AFML, and associated APIs.
| Version | Release Date | Notes |
|---|---|---|
| v0.2 | 3/27/2017 | Added memory profiling for ACL and ADSL; added command to build API documentation. |
| v0.2 | 3/9/2017 | Alexa Client SDK v0.2 released: Architecture diagram has been updated to include the ADSL and AMFL. CMake build types and options have been updated. New documentation for libcurl optimization included. |
| v0.1 | 2/10/2017 | Alexa Client SDK v0.1 released. |